
How to Set Up a 3-Node Kubernetes Cluster on Ubuntu 24.04 LTS Using Oracle VirtualBox
In this blog post, we’ll walk you through the process of setting up a 3-node Kubernetes cluster using Ubuntu 24.04 LTS as the operating system, Oracle VirtualBox for virtualization, Kubernetes v1.30, Containerd as the container runtime, and Calico as the CNI (Container Network Interface). By the end of this guide, you’ll have a fully functional Kubernetes cluster running on your local machine.
1/29/20252 min read
Table of Contents
Introduction
Prerequisites
Step 1: Set Up Virtual Machines
Step 2: Install Containerd
Step 3: Install Kubernetes Components
Step 4: Initialize the Kubernetes Master Node
Step 5: Install Calico CNI
Step 6: Join Worker Nodes to the Cluster
Step 7: Verify the Cluster
Conclusion
Next Steps
Introduction
Kubernetes is a powerful container orchestration platform that automates the deployment, scaling, and management of containerized applications. Setting up a Kubernetes cluster locally is a great way to learn and experiment with Kubernetes without the need for cloud infrastructure.
In this guide, we’ll use Oracle VirtualBox to create three virtual machines (one master and two worker nodes) running Ubuntu 24.04 LTS. We’ll then install Kubernetes v1.30, configure Containerd as the container runtime, and set up Calico for networking.
Prerequisites
Before we begin, ensure you have the following:
Software Requirements
Oracle VirtualBox installed on your local machine.
Ubuntu 24.04 LTS ISO file.
Stable Internet Connection.
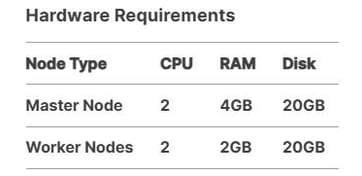
Hardware Requirements
Knowledge Requirements
Basic understanding of Linux commands.
Familiarity with networking concepts.

Step 1: Set Up Virtual Machines
1.1 Create Virtual Machines
Open Oracle VirtualBox and click New.
Create three virtual machines:
k8s-master (Master Node)
k8s-worker1 (Worker Node 1)
k8s-worker2 (Worker Node 2)
Assign 2 CPUs, 4GB RAM to the master node, and 2 CPUs, 2GB RAM to the worker nodes.
Attach the Ubuntu 24.04 LTS ISO to each VM and complete the installation.
1.2 Configure Network and Static IPs
Go to Settings → Network for each VM and set the adapter to Bridged mode.
Assign static IPs to each node by editing the Netplan configuration file:
Example configuration for the master node:
Apply the changes:
1.3 Disable Swap
Kubernetes requires swap to be disabled. Run the following command on all nodes:
Step 2: Install Containerd
2.1 Install Dependencies
Update the package list and install required dependencies:
2.2 Install and Configure Containerd
Install Containerd:
Generate the default configuration file:
Restart and enable Containerd:
Step 3: Install Kubernetes Components
3.1 Add Kubernetes Repository
Add the Kubernetes repository to your system:
3.2 Install Kubernetes Packages
Install kubeadm, kubelet, and kubectl
Step 4: Initialize the Kubernetes Master Node
4.1 Initialize the Cluster
On the master node, run the following command to initialize the cluster:
Save the join command displayed in the output for adding worker nodes later.
4.2 Configure kubectl
To start using the cluster, configure kubectl:
Step 5: Install Calico CNI
5.1 Apply the Calico Networking Plugin
Install Calico as the CNI plugin:
5.2 Verify Calico Pods
Check that the Calico pods are running:
Step 6: Join Worker Nodes to the Cluster
6.1 Join Worker Nodes
On each worker node, run the join command saved from the master node initialization:
6.2 Verify Nodes
On the master node, check that all nodes have joined the cluster:
Step 7: Verify the Cluster
7.1 Check Node Status
Ensure all nodes are in the Ready state:
7.2 Check Pod Status
Verify that all system pods are running:
Conclusion
Congratulations! 🎉 You’ve successfully set up a 3-node Kubernetes cluster using Ubuntu 24.04 LTS, Oracle VirtualBox, Kubernetes v1.30, Containerd, and Calico CNI. Your cluster is now ready to deploy and manage containerized applications.
Next Steps
✅ Deploy a sample application (e.g., Nginx) to test the cluster.
✅ Install the Kubernetes Dashboard for a graphical interface.
✅ Set up Prometheus and Grafana for cluster monitoring.
💡 Follow us for more tutorials and Kubernetes insights! 🚀
Insights
Expert tutorials for tech professionals and enthusiasts.
Resources
Support
cloudxtechie@cloudxtechie.com
+91 8660949099
© 2024. All rights reserved.